Outlook has the ability to automatically archive email to a local file. This allows for decreased email load on the mail server (thus, a reduction of Inbox size) and for easy transfer of older mail between computers. When starting AutoArchiving for the first time, you may notice Outlook become less responsive while the initial archive process runs. After the initial run, there should be less email to process and response times should return to normal.
Archives should be stored locally. They tend to get corrupted when you access them from a network folder. However, your local workstation/laptop isn't being backed up. So, you should backup the archive to secondary media, like a network folder or USB key, in case of a hard drive crash.
Auto Archive Setup (global folder settings)
To access AutoArchive settings, right-click the email folder (i.e. Inbox), then select Properties. In the Properties window, select the AutoArchive tab as shown below.
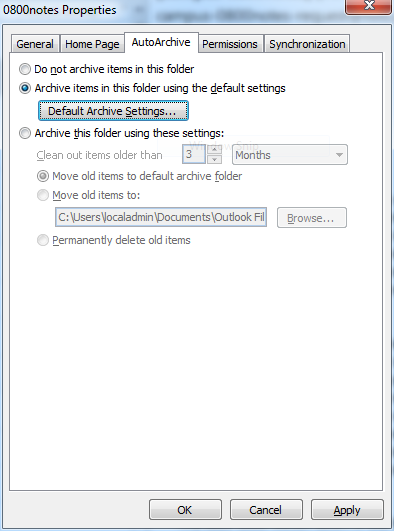
Choose the second button (as shown) and click Default Archive Settings..., which will open the window shown below.
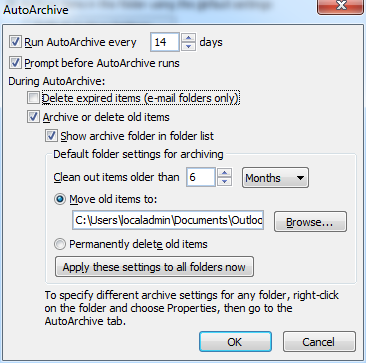
Check the first tick-box to turn on AutoArchiving and specify how often you would like it to run (default is every 14 days, as shown). Then, check the boxes as shown. In the Default folder settings for archiving section, you can specify the age limit of the email to archive and click the Browse... button if you want to specify the file location or name. If you want the same archive settings to apply to all your email folders, click the Apply these settings to all folders now button. If you do not, then you will need to follow the modified procedure below. Then, click OK and OK again to complete the process.
Auto Archive Setup (individual folder settings)
At the AutoArchive tab of the Properties window shown above, select the third button as shown below.

Again, you can specify the age limit of the email to archive. You can also specify whether to archive email to the default folder location or to a location and/or filename of your choosing. Once done setting these options, click OK and the process is complete.